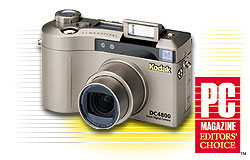
The Kodak DC4800 Camera First looks:
The Kodak DC4800 camera is at first glance, a typical point and shoot camera. A rangefinder style viewer, pop up flash unit, LCD screen on the back, and then the array of confusing buttons. Upon closer inspection, you find that there are a very large number of features not expected in a simple point and shoot camera. Things like both digital and optical zoom, an adjustable diopter on the eye piece, forced f stop aperture for better photographic manipulation, and a surprisingly very easy to understand menu system for finer adjustments.
The specifications are also pretty impressive. First is the 3.1 megapixel images that you can capture. With the flash button, you can specify auto, fill in, red eye, or off mode and unlike other cameras that assume the flash will be used, on the Kodak, you must first pop it up to use it, this I like. You need to be careful though as the flash only has a range of about 10 feet. An external flash connector is available for more heavy-duty third party flash units. There is a distance and close-up option for pictures under 2.3 feet but the manual was unclear as to how far distance an object should be to use the distance switch.
For taking pictures, there are quite a range of settings to help you take a correctly exposed and balanced image. First is the white balance adjustment that can be set to offset the color shift when using either flash, tungsten, fluorescent, or daylight settings. On top of the camera is an exposure compensation dial to adjust the range from plus to minus 2 to compensate for highly contrasted scenes. If taking flash pictures with external units or lights, you can also set the color temperature for the lights. This camera will also allow you to set the color type of your picture. You can select from the default Saturated color, or change it to Neutral color, Black and White, B&W with a Y filter (used to lighten yellows and darken blues for a more dramatic B&W effect), B&W with a R Filter (used to lighten reds and darken blues and greens for portraits and making skies more dramatic), and finally, a Sepia color. I liked tinkering with these settings and the results were surprisingly good.
Other features like a self timer (10 seconds) and a burst mode are available. The burst mode allows you to quickly take a number of pictures in a sequence but without internal flash. If you are using the high pixel images, then the most you can do is 4. The zoom features are easy to use as well. When you use the 3X optical zoom, the image in the view finder is also adjusted for you. Unfortunately, to use the 2X digital zoom, you must turn on the image preview on the LCD screen and follow the image that way. Again, in bright light, this can be a problem in seeing very well what is on the screen. Also, if your battery power is running low, you can't use the digital zoom.
Taking pictures is as easy as setting it on "P" Program mode and pointing at what every you want a picture of and hitting the shutter release button. As you take each picture, the image shows up on the LCD display screen and tells you what the image information is regarding f-stop and shutter speed. This is really helpful to give you a hint as to whether you might get both a well exposed picture, but also, whether you might have trouble blowing up an image that was taken at only 1/10 th of a second. I don't know of anyone that can take a good sharp picture at that slow of a shutter speed. To help you adjust for this, you have a couple of choices. If I want to force a higher f-stop for better depth of field, just set the dial over to either F2.8, F5.6, or F8 and it goes into aperture priority mode. You can also completely go manual in taking the picture and set both the f-stop and the shutter speed. You will need a light meter to help you with these settings as using the menus and display screen to set these settings is very difficult.
The software that is bundled with the camera leaves a little to be desired but as with the camera, there are some good features here as well. When previewing your images, you have a number of options including a slide show, magnifying the image, and a section that tells you all there is to know about the image you are looking at from when you took it to all the camera settings used.
Kodak software for the connected personal computer has both its pluses and minuses. You can control the program settings and even take a picture from the camera attached to the computer with the USB cable. A help file is also handy to have, but to be honest; I would rather use the paper user's guide to find out what I need to about the camera. The Kodak Picture Now software is definitely a throw away item. Difficult to understand and use, no help file, and when I told it to load a "roll" of pictures to do a slide show, it crashed with an out of index range error and then an Invalid Page fault. On another try, it did work just fine but still, I would use any number of other packages to view my pictures.
Connecting the camera to the computer is quite easy and straightforward. Plug in the camera and the computer instantly recognizes it and asks for the software CD. Based on what I saw above with the Kodak Picture Now software, I would just load the camera drivers.
Transferring files is also a snap. Once you get the camera installed on the computer, plug into the USB cable and it pops up as another drive on "my computer". Easy and so much quicker than the old serial connections that we have had to deal with in the past. I just drag and drop the images to a picture folder.
The camera is an equivalent to 28 to 84mm zoom lens. You also actually have six different picture quality settings to choose from, three being for the 3.1 megapixel range. A Tiff uncompressed file 9MB in size, a compressed JPG file at 1:5 compression for a file size of .9MB, and a high compressed JPG at 1:10 and a size of 480KB. You can also choose from a 2.2, 1.6, and a .8 megapixel file. Highest image resolution is the noncompressed at 2160 x 1440 pixels. ISO settings are also adjustable from an automatic setting to 100, 200, and 400. Other camera features allow you to adjust sharpness and to place a date on an image.
Recommended Accessories.
Unfortunately, nearly every camera delivered these days requires a few more add ons and this one is no exception. First on the list would be memory cards. Second would be an additional battery and charger. The battery lasted quite well for my work at the computer show and in fact, I got four days out of a single charge taking about 30 to 40 pictures a day. Compared to some of the other users, I did quite well but then I am not the type of person that has to do everything including taking the picture through the LCD screen. A separate case for the camera and accessories would be good as well. I saw several from Targus that looked pretty good.
Not bundled with the camera but included on a separate mail in card is a lens adapter to allow you to add filters, other lens attachments and the like. Not having seen the box I don't quite know why it wasn't included but suspect it was for space and was thought of later. There is no threading on the lens for addons so you definitely need the adapter.
What I like.
This is a darn good camera to use. I found it fit pretty well into my hands and I could take pictures under most conditions. In the straight forward point and shoot mode it works great. I also like being able to set it up for aperture priority mode for better control on the pictures.
Little things are also noteworthy like the eject button for the Compact Flash memory card which makes removing the cards so much easier. With many cards available, you can get memory up to 340MB and the micro drives up to 1GB. That is a lot of memory to have around. Be wary that the micro-drives also consume a lot of power. Speaking of Compact Flash memory, I think this will become the standard of choice for digital cameras going forward so that is a plus. I can take these images directly into my Pocket PC which is also a plus.
What I don't like.
It allows you to take pictures that you shouldn't. what I mean there is that if the shutter speed is too low, it will still take the picture and often, you can't tell it is not a good picture by the LCD screen, this is a failing of most cameras. The diopter dial is difficult to use and so if multiple people are using the camera, it will be a pain to keep adjusting. The zoom lens adjustment lever is behind the camera so if you are wearing glasses, your thumb will often get in the way, also, it is easy to accidentally hit forcing you to readjust. The power on/off button is where you would expect the shutter release to be so several times, I often found myself turning the camera off when taking a picture.
The battery is a proprietary 3.7v lithium ion battery that while gives you quite a bit of picture taking power, needs to be recharged with the camera plugged in. I would have much preferred rechargeable AA batteries for ease of finding and replacement.
When taking pictures, I noticed that if the light was at a wrong angle, which can quite often happen, it makes it difficult to see through the viewfinder. A rubber cap or hood would be nice. Another nit pick item is that there is no tether to keep the lens cap from going too far. It was quite flimsy and did bounce off the camera several times when either putting it away or taking it out of the travel bag. I suspect that both of these items are going to be a problem with many digital cameras.
One other problem is that when you are taking pictures, you have to tilt the camera away to see the top display if you want to know what the picture settings are that the automatic exposure is going to use. Not good if you spent some time framing the picture correctly.
Finally, I found that the led indicators in the view finder were actually too bright. When the yellow or green light goes on, you really notice it and it can be distracting.
Overall, this is an excellent camera from a technical standpoint. I like all the features that it includes and look forward to seeing most of these on other cameras. The placement of several parts including the power button and zoom button can make for difficult picture taking at times. When looking for the camera, buy.com had it for $799 (64mb card), and Egghead.com had it for $699 (16mb card). Look for it around $650, this makes for a good price point for a 3.1 megapixel camera. This is certainly a camera worth taking a look at and you should probably add it to your short list of cameras.
Return to ![]() Sansoft LLC Home Page
Sansoft LLC Home Page
Email Robert Sanborn at:
Copyright 2001 Sanborn Software Systems LLC
This Page Last Updated: