JASC Paint Shop Pro 7
Dazzle Digital Video Creator II
Of all the graphics programs that we see come and go, this is the one that I stick with and use. You may not know it but JASC started as a shareware software company by a commercial pilot writing software in his spare time and look what it has become today. Paint Shop Pro (PSP) has been around for quite a while and I have been using since the original versions. I find it is a compact and easy to use program but carries a ton of features that you only find in the bigger, more expensive, and more well known programs like Adobe Photoshop and Corel Draw. For image editing, scanning pictures for the web and the printer, and many other tasks ranging from simply making a copy of a document, this is the program I use. It is the kind of program that as you keep using it, you find there are more and more features available to you when you get to the point of needing them. It seems that every time I get to a point where I think, gee, it would be nice if I could do this, I dig deeper and find that PSP does actually do that.
If you are a PSP user, you will find some really neat features in the new version 7 that just came out and I for one am really looking forward to upgrading. It now does auto color balancing and contrast adjustments and makes cleaning up your pictures a real easy task. With this new version, there are 18 new filters for image editing including things like red eye removal for both humans and animals. It is a big deal when you find out that red eye removal for a dog is different than for a person. There is even a scratch removal tool. They have also greatly improved the preview tools so that when you work on a histogram to see what it will do, you will actually see what it is doing to your image. If you scan images and find spots all over them, there is also a moray tool remover. You can also tell it to preserve the edge on an image as you zoom in to correctly smooth things out. I mentioned the proofing tools, it also works with the special effects browser to see what it does and the impact changes will have on your image. Other things added include vector graphics capabilities and a new line editor added. They have also given the brush strokes many new options as well. Definitely worth upgrading. www.jasc.com
PSP is an easy program to install and setup. The self installer is straight forward and the only problem I saw with it is that it does not look for older version of Paint Shop Pro to remove. In fact, when I went in to remove the old version, it was not even listed in Control Panel so I had to use Explorer to remove it. The other quibble I had was that I had installed the trial version of PSP 7 and in order to use the full version, I had to uninstall the trial. The bad news was that it did not completely uninstall it as when I installed the new version, it had kept track of where my files were and my settings, and that was the good news, I didn’t have to reset that up.
I like the interface to the new version and how it keeps everything out of the way. I also like how the new version allows you to quickly customize the tool bars. A couple of new wizards that I found handy were the jpg and gif converters that allow you to determine compression of the file and the file size before creating it. You can also set transparency options for gif files. I also like the new controls when you are adjusting settings like brightness and contrast. Rather than plug in number or single notch settings, you can move the slider for a quick view of what the change will do to your image.
Dazzle Digital Video Creator II
One of the surprising products I found at the Comdex computer show last fall was from Dazzle. They had a press briefing and to be honest, I decided to go only because one of my press buddies was going. To start with, I do not own a video camera (cam-corder) and actually, don’t really have any intention of getting one. For years, I had seen the incredibly poor results that people were getting in their home movies and I had the real fear that if I got a cam-corder, my movies would be just as miserable to watch. Of course, if they had used something as simple as a tripod to mount the camera, they would find that the images actually looked pretty good. In fact, when traveling to national parks and the like, to see people waving the cameras around (while taking pictures) you wonder if anyone actually watches the things without getting sea sick. Also, having grown up loving still cameras and images from the greats like Ansel Adams, when ever I did see a landscape movie or film that I really liked, I discovered that they were using thousands upon thousands of dollars worth of equipment to make those movies and that depressed me even more. So I stuck with film cameras, and today, digital cameras. So, what was I doing unpacking the Dazzle Digital Video Creator II ? well, hard telling.
I guess one of the reasons is that one of the things I noticed while wandering the halls of the Comdex computer show was the use of video everywhere. In fact, in talking to friends, I am noticing how much people are beginning to download video clips from the web (assuming you do have cable modems or DSL installed) and share them via CDs. When you talk to the industry insiders, they tells us that the next big wave will be the PVR or Personal Video Recorders.
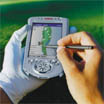
First of all, what is Dazzle? It is a way of creating and editing DVD quality video on your computer. It is both hardware and software in that you need the Dazzle connection box that connects to a proprietary MPEG-2 PCI card installed in your computer. What it will do (according to the box) is to allow you to save, edit and organize home videos; create video for presentations and the internet; watch DVD movies on your PC, and record your video to either tape or a CD. It is the software that does most of the above but you definitely need the Dazzle connection box to allow you to connect your VCR, Camcorder, or other composite video feed into your computer via either Composite or S-video connection. Having recently seen the Video Wave software from MGI, I was also interested in comparing it to the Dazzle MovieStar editing software. Besides all of the above, the Dazzle package comes with a very wide assortment of cables to get you connected to your gear. Also included in the box are a quick start guide, the Dazzle MovieStar software manual which is pretty good at first glance, software CD, the DVDit! User Manual for creating DVD discs, and the usual registration card, warranty, and promo literature. Don’t loose the tiny cards with serial numbers.
Dazzle is definitely not for the weak of computer either. It requires a Pentium II at 400mhz or faster, 64MB of RAM, a free PCI slot, and at least 300MB of free disk space to start. I would also recommend several gigabytes of space for your video movies as well. It runs on Windows98, ME, and 2000. Currently it does not run on an AMD Athlon K7.
I decided to install it on my test system that was running Windows2000. The first thing I noticed was that you need to be careful and double check the connections on the camera. The one I was using (JVC GR-AMX700) had a “digital” output connector but that was not an S-Video connector but a connector to go to a serial port on a computer. Installing the card is not a problem if you have done it before. The installation guide tells you that “if you encounter any resistance (to putting the card in), do not force the board.” Those of us that have installed cards over the years know quite well that PCI cards can be rather difficult to insert into a mainboard and sometimes you really need to give it a very hard push. When I turned on the computer, the anew hardware wizard and found new hardware windows came up but then never left, nor did it ask for the location of the drivers. Windows2000 still thinks that they are running and so I had to end task on them.
The software installation went pretty well. I like it when they ask you before installing all sorts of components even if you will need them. It also gives you the chance to say no to the automated screen saver module. One thing I don’t like about the install is when you have to enter a convoluted serial number for an “LE” version of a piece of software like the DVDit!. And to top it all, the stupid serial number is case sensitive. One black mark for Sonic software. I am not even sure why I bothered to install this software because I certainly don’t have a DVD writable drive.
Once the software is installed, and you restart your computer, you start up the MovieStar program and it immediately kicks you into the setup program to make sure everything is working ok. In my case, since the hardware drivers did not load, the setup program could not detect the Dazzle box but when I tried to exit the setup program, it would not close and gave an error message box with no text in it. When I looked at Device Manager, it showed that the driver had not been installed for an unknown multimedia device, which I assumed was the Dazzle card, and told it to reinstall the driver from the CD. Once that was done, shut down and restart the computer again and then the setup program fired up just fine. Unfortunately, there is no trouble shooting guide included with the setup program and no help files either. The setup program is pretty good though when things are working, you see your video source on a screen on your computer and hear the sounds coming in through the audio tracks and out your sound card.
Like most of this new breed of software, the interface is somewhat intuitive when you fire it up and they do help with the rollover buttons that will tell you what they do but like a lot of new technologies, you do need some assistance in getting started and the user guide is helpful. What you do need to do though is to pretty much go through the entire guide before you get started so it gives you a good over view of what you need to do and where. You start by capturing a number of video clips to your hard drive. One quibble here is that I wish they would store them someplace easy to see like “My Documents” but they are buried in the program folder so you need to go into the options before importing images and change that. If you change it after the fact, the catalog needs to be re-imported. The MovieStar software is currently version 4.21 and it still feels to me it needs some work. A couple of times I got some strange errors about work space not being available and so it could not save a change I just made. Close the program, restart and it goes away. A few other little nits when working is that you drag a movie clip down to the editor window but then after doing it, you have to select it again in order to make changes. You would think with working on only one clip, it would know that but you still need to select it after the fact. In working with this software, I would be inclined to use MGI’s Video Wave along with this package, use the Video Wave to edit the movie, and then this package to import and export it. Another little nit showing the software’s need for polish is when you click on a file and then click convert, sometimes it goes right into the convert settings with the file selected. Sometimes it doesn’t and you have to go into the browse window to select it again. The problem here is that if you have changed the name of the file in the preview window, it only changes the name for the preview window and not the real name of the file so when browsing here to find the file, you must know the name it started with. As I said, it needs some work.
Where the software does shine in its conversion and out put capability with the Dazzle box. In the conversion area, you can convert your movie clips to either a Real Player format or Windows Media Player and both with a huge variety of options. Video when in its native mode is quite large, for example, in a short video clip we put together, an 18 second clip in the mpeg format took 9.7mb of space. At that size, the video, and audio portions look great and even when expanded to full screen it still looks pretty good. What the conversion software does for you is to allow you to compress it dramatically for use on the web. That same file was able to be compressed to less than 50K in size. Now comes the tough part, how well do you want that video to look compared to reducing the size for downloads. I guess if you are on a cable modem, you don’t care but if you are still expecting your friends, family, clients, and whatever, to download the video clip at the depressingly subsonic speeds of 33,400 bps, then you need to do some real compression and this software will help. In testing the conversions though, I did find some interesting things. Again, staying with my 18 second clip that started at 9.7mb in size. Using the converter for Real Player, the file could be shrunk the most down to 50k in size and in trying the different settings, I got file sizes from 50k to 141k in size. Unfortunately, none of these would I consider acceptable. Now I may be setting my standards too high but when the video is just too choppy or the color bleeds too much on the image, I really can’t accept that. However, if you must email that video clip to someone, and you have a clip that is considerably longer, then you may want to reconsider. In working with the Microsoft Media player conversion settings, I did find that I had quite a bit more latitude in tinkering with the video clip. While the video sizes started out much larger, I did find that with compression, I could get a pretty decent video clip at around 1.2mb and a passable one at 560k. Unfortunately, zipping the files doesn’t do anything to reduce the file size. Still not bad compared to the original size of 9.7mb.
When editing the clips, you have the advantage of previewing the work as you go and then when you are ready to mark the beginning and end of a clip, can actually step through it one frame at a time for real precision. This also helps quite a bit when you are preparing to add additional voice or music tracks to the video clip you are editing. The audio tracks that you add can also come from any source as well including an attached microphone to add voice overs. Naturally one of the problems of using a microphone is the inclusion of background noise which can be a problem. At this point, you can also add scrolling titles, create your transitions, and with the new Webcast Theater, quickly turn your videos into an internet ready file for your own web site or to use the new video sharing web site that the Dazzle folks have setup.
What I did not test on the Dazzle but it is capable of doing is the input or output directly to a VCR. You can also take feeds directly from any other video source like an ATI All in Wonder card that gives you direct video feed from a cable source. I also did not test the DVDit! Software from Sonic that allowed you to make interactive DVD Quality movies for use on a CD-R or DVD-R disc. The manual comes with no index or glossary and that would be helpful in understanding some of the terms associated with videos and editing them. What really sets this product apart is the hardware you get. The software can either be replaced with something else as I mentioned or will be upgraded but the good news is that you have a choice. And oh by the way, the DVD player included works great through the MPEG-2 PCI card included with the system.
The Dazzle Digital Video Creator II is available at places like Best Buy or you can buy direct from Dazzle at their web site, www.dazzle.com for $299. Their web site is pretty extensive with a lot of information about product, tips for using it, and help files and updates. All in all, for video editing, cleaning up those old video tapes, and producing your own movies, this is a great place to start.
(From the April 2001 Indy PC News)
As much as things are advancing in CD Media and the like, I am still surprised, well maybe not, with the amount of cheap junk still with us. Years ago I found this to be true in computer hardware. I would go to the Comdex computer show and see companies selling video cards from anything from $5 to $200. Now a video card for most of you is nothing more than what lies between your monitor and your computer. It makes sure that what you want displayed gets shown on the screen. In a nutshell, that is all it does. Granted to show more colors, you need more memory on the card and in fact, for the things that most people do, internet surf, word processing, and email, a video card with 1mb of ram is more than enough. But I have seen cards with 128mb of ram onboard and I suspect it will keep growing. It used to be you spent more money for more memory on the card to show more colors at a higher resolution and today, most people see things on their screen at a minimum of 800x600 and many at 1024x768. So what really separated the cheap video cards from the likes of those from companies like ATI? You get what you pay for in cheap equipment, poorly working drivers, and cards that can fail and take the rest of the computer with you.
Fortunately, in the world of CD Media, the risk of damage and crashes are much less with cheap media but one thing I found with my old HP CDRW drive is that it was really picky with the media I used. For my old drive, the only media that would work reliably was HP, Verbatim, and Sony and I think Ricoh. So what would happen and probably you have seen the same problems with your CDRW drives. First of all, you start getting the spurious error messages that you really can't find in the help files. Then you find that the process finishes ok but then you can't read the CD or you can't stick it into another computer and read it. And did I mention that the life span of a CD after you have burned one can be anywhere from 5 years to 100 depending on the material used. Again, you get what you pay for. Most CDs today use a thin metallic aluminum film that is bonded to a plastic disc. Sandwiched between those two pieces is a chemical bath primarily of Cyanide. Where the problem comes in is in the thin metal foil. Quite often, there is nothing separating you from that foil and the dye bath below. If you are lucky, the manufacturer has bonded a paper or plastic cover to that metal so that you can then either write on the surface or glue a label to the CD. I have seen with the cheaper media how sensitive that is so that when they tell you not to write on it with a ball point pen or any other sharp object, they are not kidding, it doesn't take much to score a groove into the top of the CD which unfortunately, makes it unreadable. We spend so much time protecting the underside which is the hard polycarbonate plastic disc that we forget that the real danger is on the top of the CD. One CD I purchased on a trip was so cheaply made that when I played it, the label started to come off and guess what, so did the foil underneath. Ruined.
Review of Biolink Umatch Mouse |
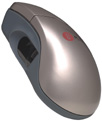 |
In my ever increasing paranoia about computer hacking and security, I came across a pretty neat product called the Biolink Umatch Mouse. A one touch computer security system and so far in my testing, has been really up to delivering on what they promised. It is from Biolink Technologies out of Florida, www.biolinkusa.com, and consists of the Biolink Umatch mouse, drivers and software, and the Biolink authentication software. What this system does after you install it is to turn the mouse into a thumb print scanner. And what a scanner. According to the company, they use a proprietary means of scanning the thumb print to the point of it actually knowing that the thumb is a living thumb attached to the person being scanned. The best part is that you never have to worry about the password on the system and as you know, Windows passwords are pretty worthless to begin with but this system will not allow a user to even start into Windows without being scanned. Another benefit is the Biolink Vault software package that allows you to encrypt files on your computer into a sort of electronic vault. The vault is opened and unlocked when you scan into using the computer and when you shut it down (or at any other time you choose,) it relocks the vault so that even if someone came in and bypassed Windows, your locked files are still secure.